Tune-up Tutorial
Paul Walbran Motors, May 2017
Click here to download this tutorial as a PDF file
Introduction: 3 simple rules
The objective of tuning is (without modifying the engine) to get as much useful energy as possible extracted from the fuel consumed, leaving less to be wasted as heat. This gain may be used to improve fuel economy or to produce more power, or a combination of both, depending on the driver’s preferences. In this “sweet spot” the engine will also be better mannered.
In this context, tuning is not about modification to increase power output. A worth aim for some but not the topic of this session!
When your car was new, tuning was easy. The manufacturer put a lot of R&D into perfecting the state of tune for the engine as-built, and helpfully listed all the relevant settings in the workshop manual. All that needed to be done was set it as specified and voila! It was tuned.
However, as classic cars enthusiasts most of the cars we own are old. The intervening years have brought about varying stages of wear in the components which govern your engine’s tune, so this makes tuning rather more of a challenge. It’s a bit like us: when I was young, I was a bit of an athlete and fit as a fiddle. A few decades later various parts of me have got worn, some have even been replaced, and I can’t get to back that level of fitness without something radical happening. Like a time machine perhaps. So there’s no point in my expecting to run a mile in 4 minutes 20 as I could when I was 17! Fortunately for our cars (unlike humans) the wear can be remedied properly and they can be got to perform just as new if given the right TLC.
So the first rule is that to get your car tuned properly, you must first address a few decades of wear and tear on those bits that govern the tune: the ignition system, fuelling, and even (if applicable) overall engine health. Unless this is done, attempts at tuning will be at best half baked and more commonly a failure.
The second rule is DO NOT TOUCH THE CARBURETTORS UNTIL EVERYTHING ELSE IS DONE! There is a very good reason for this golden rule: to set carburettors, the engine has to be running. If there is a fault elsewhere, no amount of fiddling with the carbs can possibly fix it, because that fault isn’t in the carbs in the first place!

This would have to be one of the most broken rules ever, and as a result multi-carburettors have gained a completely unfair and untrue reputation for being hard to tune. More than once I have found people wanting the carbs tuned to cure the rough running when the problem was in fact a blown head gasket!
Going back to 17-year-old me, my experience illustrates the problem: I bought my first MG, which of course had twin carbs as they do. Everybody I knew sucked their teeth and sagely advised me that twin carbs were devils of things to keep in tune, so when the car inevitably went off-tune I fiddled with the carburettors. And of course it didn’t make a jot of difference at all because the problem was never in the carbs. Variously it would have been that the ignition timing had shifted as the points wore, or perhaps one of the spark plugs or valves was getting iffy, etc. So I concurred with my sages, and told the next MG owner I saw (not to mention my mate that bought a Riley, and anyone else who would listen) what a devil of a job these twin carbs are, impossible to keep tuned!
And thus the myth perpetuates.
Stick to the right process and it all becomes satisfyingly easy. And what is the right process?
Keep your hands off the carbs until everything else is right!!
Got the message? If not, go and write it out 100 times you naughty child.

The third key point is to use the right grade of fuel. Contrary to what you may expect, fuel shouldn’t explode in the cylinder, it should burn evenly, spreading out across the cylinder from the ignition source (the spark plug). It does so quickly of course (around 1 millisecond or two, +/- a bit depending on loading for the technically minded) so it doesn’t take much to upset it. With a little provocation it will explode, causing your engine to rattle its head off (figuratively speaking). This very audible sound we call knock, pinking, etc.
What provokes explosion mode is a critical combination of high temperature and high pressure. Assuming that the engine is at normal temperature and there is nothing amiss internally, then the main thing that governs pressure at full throttle is the engine’s compression ratio. Compression ratio is our friend: the higher it is the more useful energy we extract out of a given amount of fuel (=more power and better economy), but it is a friend that is fussy about its fuel diet. Incorrect ignition timing (too advanced) can also be a source of excessive pressure, while hot points in the combustion chamber can act as unintended ignition sources.
To deal with the extra pressures generated by higher compressions, we want the fuel to be stable enough for explosion not to happen. Petrol’s octane rating is a measure of its stability, and ability to cope with higher compressions. (It’s true! It’s not some sexy ploy dreamed up by the oil companies’ marketing teams!) For those of us whose classics have sporting engines, this is an important point to remember:
Rule number 3: Use the right octane rating.
Specifically, high compression options (most nominally around 9:1) for BMC and Jaguar engines are better off using 98 if possible but can live with 95 (albeit with a loss of efficiency and a greater tendency to run on) if they have to.
Newer engines are more tolerant. Specifically, most European cars have compression ratios of around 10.5:1 and should use 98. This includes the MGF. As noted above, the manufacturers like high compressions and so should we: It squeezes usefully more energy out of every litre of fuel rather than pumping it out the exhaust or cooling system as heat.
It is of course possible to run engines on fuel below their optimum octane rating. However, doing so either wastes energy and/or causes engine damage, the degree and rapidity of which will depend on the extent of mismatch. Most often engine damage is long term and is more a matter of bringing forward the time for a recondition by quite a bit, but occasionally it can be more dramatic – such as a hole in a piston.
Rigorous tests have been done which establish that, despite the cost disadvantage, higher octane fuels in engines which need it will be cheaper to run than using cheaper low octane fuel. Why? Because the fuel isn’t stable enough to burn properly, so a lot of its energy gets dumped as heat as the resulting explosion rattles the piston around, or fights it while it is still on the way up the compression stroke. Yes, it can be re-timed to mitigate the worst of the explosion, but that doesn’t produce anywhere near the efficiency of proper timing on the right grade of fuel.
Two final points on fuel quality: High octane doesn’t benefit (low compression) engines that don’t need it, and some octane boosters on the market work and some don’t. If you want to go the latter way, do some proper testing to see if you have a good ‘un or a pup.
OK, that’s the end of the rules!
Bits that wear
As noted in the opening paragraphs, our old classics usually have varying degrees of wear that complicate the tuning procedure. The principal culprits are:
· Cylinder leakage
· Ignition timing mechanism
· Distributor drive train
· Spark quality
· Carburettors
Cylinder leakage:
Leaky rings or valves, burnt valves, leaky or blown head gasket are all well-known sources of leakage, so don’t even contemplate tuning your engine without giving it a simple health check first.
Valve clearances:
Your valve train (the bits that open and close the valves) wear, and the clearances (which are there to ensure valves shut properly and avoid shocks when opening and closing) change accordingly. The right valve clearances are important part of a tune and are also a good measure of what is happening in your valve train. Tune-up time is a good opportunity to check them and monitor what’s going on. Doing so gives you a chance to identify developing situations early and head off costly repairs.
Ignition timing mechanism:
The spark on an engine has to be fired at just the right time to optimise the push of the burning gases. It’s like pushing a child on a swing: Get the timing right and the swing will be awesome. Be a bit early with the push and you’ll check the motion of the swing a bit, losing momentum. Be too late, and your push is largely wasted (late enough and you’ll end up flat on your face!). Getting the push at the right time in your engine is what your ignition timing mechanism does.
Because the fuel burns steadily (doesn’t explode, remember?), it takes a “while” for the flame to travel across the cylinder … a millisecond or so. This means that the spark has to be fired ahead of the ideal time for the push. The amount will be 20-30 degrees even on an engine at idle (for the technically minded: the best maximum pressure occurs 10-20 deg after TDC, not at TDC. The actual figure depends on various engine design parameters.)
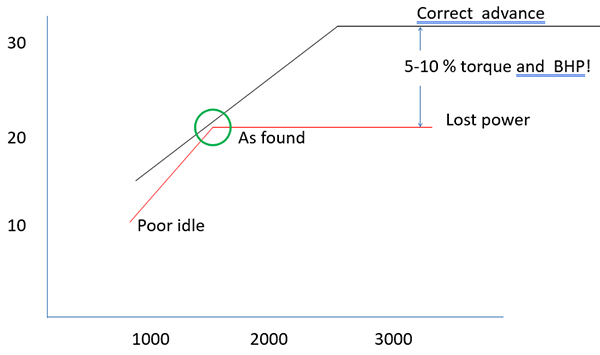
One thing that doesn’t affect the burn rate directly is RPM, so as the engine speed increases we have to fire the spark earlier and earlier, up to a further 20-30 degrees or so (again, depending on the engine characteristics). This is known as giving the spark more advance, and is achieved (in our pre-computer classics) by a centrifugal mechanism of weights and springs in the distributor. And guess what? They wear out! And are the most common thing that tuners fail to address, yet the difference between worn and correct is startling. The graph below shows the correct advance line and the “as found” advance for a typical worn distributor. In this case the distributor had been retarded to prevent the onset of pinking (at the position shown by the green circle) brought about by advance coming in too quickly, which in turn happened because the advance mechanism was worn and tired. The timing was right at that point, but wrong everywhere else as can be seen.
Vacuum advance:
Though RPM is not a direct factor, the actual burn time depends on a lot of other things like temperature, pressure, number and proximity of gas/fuel molecules, fuel used etc. Some of these in turn are influenced by how far down or not your foot is on the accelerator. Cruising at 30mph there is nearly a vacuum in the cylinders, with just a sniff of fuel going in, while at full throttle it is all on. So the burn time range at any given speed can be from less than a millisecond to 4 or 5 or more. That’s quite a variation, so to optimise efficiency under the variety of throttle openings continuously used, we have a vacuum advance mechanism too, which applies an extra lot of advance when the pressures in the engine are low (ie part throttle conditions). Vacuum advance doesn’t make any difference to the power output (it drops out at full throttle), but is very helpful to fuel economy. And is one more thing to wear out and check!
Ignition timing scatter:
Wear in the distributor drive, and also in the distributor itself, can lead to instability in ignition timing – known as scatter. See https://www.youtube.com/watch?v=7Cr5G_I84Qc for on-line you-tube example. In this video, initially the timing marks are moving steadily as the timing advances while the engine picks up speed. Then about 5 seconds into the video the timing marks start to randomly dance all over the show, in response to the spark timing fluctuating wildly. Any hope of consistently correct timing is removed, with the result being lost power, economy and stress on the engine.
In BMC engines, the principal cause is the gear on the camshaft which drives the distributor. +/- 5 degrees is not uncommon, while it can be up to +/- 15-20 degrees. Note that even with a new flash fully electronic distributor fitted, if gear wear isn’t addressed then scatter won’t go away.
Spark quality:
This best known of the underlying faults is caused by poor component condition reducing the voltage and/or amount of charge generated by the ignition system, which in turn affects the size and duration of the spark at the plugs and therefore the efficiency of the ignition process.
Electronic ignition:
Electronic ignition has real benefits.
- It improves spark quality
- Spark quality doesn’t deteriorate as the points wear
- It maintains ignition timing, which in points ignition systems drifts as the points wear. (timing retards 1 deg per thou of points wear)
This in turn leads to better cold/winter starting and better high RPM spark quality
There are three types of electronic ignition in principle:
• points replacement only
• points replacement with spark boost
• full electronic distributor
There are several methods/systems/brands of each. The biggest gain is by eliminating the points. If your distributor has excessive wear and is does not have electronic points, then a full electronic distributor might be economical. I prefer the fully programmable type, as it gives better opportunity to match the factory-specified advance curve.
Carburettors:
Over time, the carburettors do wear significantly, roughly at about the same rate as the rest of the engine. So when an engine is reconditioned, the carbs should be art of the package. More often than not they haven’t been, so since wear makes them impossible to set up correctly, check them out. Here’s what to check:
• damper oil level
• throttle spindle wear
• float valve setting (workshop manual has details)
• Check jet for excessive wear (looks oval, or flush/protruding above bridge when last set).
• In SU HIF carburettors (mid 1970s onwards), cold start O-ring failure will also result in jet running out of upwards adjustment in an effort to lean things off, and still being rich.
• Look for excessive metering needle contact.
• For fixed needle carbs, check the jet is centred (workshop manual has details)
• Check for leaks (fuel leaks in the carbs, air leaks in the manifold)
The business end
In summary, here are the key steps of the tuning process needed for older cars:
1. Record what is going on with the engine before touching anything, paying attention to the above.
2. Fix anything that is not up to scratch
3. Carry out the tuning adjustments, leaving the carbs until last (of course, you have the message now).
Now for the details:
Step 1
Note the existing settings before changing anything as follows:
(The order of the following checks is such that you can work progressively through them without having to repeat work. The checks to do while the engine is running are presented first, then come the checks to do once the engine is stationary, finally the checks with the spark plugs removed.)
Ignition timing:
Check/note: (you will need an assistant for this)
• Current ignition timing at idle
• Current ignition advance rate by measuring total advance every 500 RPM until stops advancing. (vacuum disconnected). You will need a timing light to do this of course. If you don’t have one, it is worth the effort buy or borrow one, or to get it done for you.
• Vacuum operation by holding the engine at 2000 RPM and reconnecting the vacuum whilst observing the timing marks with the timing light.
• The quality of timing by seeing if the timing marks when viewed with the timing lamp are steady or scattering, and if the latter by how much.
• The distributor baseplate (that’s the bit the points are screwed to) for sideways wear (vacuum advance models)
Spark quality:
Check for signs of a weak spark. You can check spark simply by :
• Fitting a spare lug to one of the plug leads, earth the body of the spare plug on the engine and crank it over to observe the spark.
• Or if brave, hold the HT lead close to the engine and see how far you can pull it away before the spark stops (at which point y our hair may stand on end if the lug leads are dirty/damp/tired)
• make a point of finding what a good spark looks like so you have a reference
Check the condition of ignition components as follows:
• Points: excessive burning or pitting will require renewal of both the points and the condenser (Condenser function is to protect the points, if they are in poor condition the condenser is suspect.)
• Distributor low tension lead: fraying or tatty
• Rotor: Check for signs of burning or cracks, condition of contact blade, and the use of a rivet to secure the blade. If the latter, discard and renew.
• Cap: look for cracks, electrode condition, presence of debris inside the cap, carbon brush condition.
• Leads: general condition, especially at ends. Look for signs of not making proper connections at the ends
• Coil: visual check of the exterior. Check HT contact condition.
• Wiring: Check LT wires to coil and distributor – cracked insulation will lead to breakage, renew now before it fails on a dark rainy night!
When renewing components, quality is important: cheap rotors and condensers especially failure-prone and can leave you inconveniently stranded.
Spark plug condition:
Look for:
• right heat range (see next section)
• electrode erosion
• excessive fouling
• signs of running lean/overheating.
• etc
Online, you will find helpful spark plug interpretation charts like that below. Note however that most of them relate to leaded fuel. Unleaded fuel gives different results, in particular the classic light tan deposit is a lead feature, unleaded gives varying shades of grey. Plugs from an engine that has been idling may even look blackish at the correct mixture, but the black deposit shouldn’t be thick and fluffy.
Spark plug heat range:
Spark plugs have a narrow operating temperature range, so getting the “heat range” of the plug right is most important!
• If too hot: they burn and break down (results in misfire, pre-ignition, engine damage)
• If too cold: they foul (results in misfire, inconvenience)
Note: When buying new plugs check that what you are given is what the manual specifies. BMC engines generally run Champion N9Y or equivalent in standard engines. The NGK equivalent is BP6ES. At least one retailer is incorrectly listing BP5ES for this application, which is too hot for this application and will cause pre-ignition and other issues.
Compression check:
Always check compressions if only by listening to the engine whilst being cranked on the starter. There should be a steady beat as it does so, not an uneven one. If in doubt, get it checked.
The key point is that the compressions are even, within 10%. (Gauge calibration can vary, so absolute readings have less significance)
An engine with tired rings can sometimes give fairly uniform compressions. Do a blow-by check if in doubt: remove the oil filler cap and look for fumes escaping from it while the engine is running.
Valve clearances:
Measure and record before adjusting! Keep the record so you can observe any trends over time.
· monitors for Valve Seat Recession
· Correct clearance helps maintain valve train life
Check valve gear condition. Worn components make clearances hard to adjust accurately
Carburettors:
• Check throttle spindle wear (limited tuning success if worn)
• Check and adjust float valve setting (refer manual)
Note that one-piece floats are not adjustable:
– don't pack under float valve and carb body/lid - adjustment this way is too coarse.
– There should not be any washers under valve body.
– If the valve doesn't shut off until too high, renew it and the float pin. (and if badly worn in the eyes, the float). I have yet to find a float that is not at the right height with everything new.
• Check jet for excessive wear (jet looks oval, or close to/flush/protruding above bridge when last set).
Note: HIF cold start O-ring failure will also result in jet running out of upwards adjustment in an effort to lean things off, and still being rich.
• Look for excessive metering needle contact.
• (fixed needle carbs) check the jet is centred (refer manual)
• Check for leaks (fuel leaks in the carbs, air leaks in the manifold)
Step 2: Remedial actions
If the above checks reveal anything not up to scratch, fix them or prepare for a frustrating and inconclusive tuning experience! Here are things you can do yourself even with limited gear:
Weak compressions:
Major surgery required … start saving!
Ignition timing:
First: Get the mechanical advance curve right!
Actions include:
• tighten spring hooks
• new springs (may need tightening too)
• build up the stop
(all as required)
Then: renew the vacuum unit if not working. The correct specification is important, a mismatch is a waste of money.
Ignition timing scatter:
Start saving for this one too L New camshaft (BMC engines) or distributor overhaul required.
Spark quality:
• Reface/renew points. Alignment must be right!
• Renew condenser if points were burnt
• Renew low tension lead if tatty/frayed
• Renew base plate if sloppy
• Renew earth strap for base plate if frayed
• Renew low tension wiring if insulation cracked. Use the right colours!!
• Set points gap
• Renew other HT components if required (rotor, coil, leads)
• Renew spark plugs if required
• Set plug gap - even for new plugs
Valve clearances:
• Adjust to correct clearance. Refer manual for process.
• Allow for any wear pit (if present) in the rockers where the valves contact.
Carburettors:
Fix the components checked above as required, based on what you find above.
Or prepare for failure. Carburettors are difficult to tune only when clapped out. (or the fault isn’t with them of course)
Step 3: Adjustments
Ignition timing:
Set the final timing. If the advance curve is correct, it won’t matter what method you use.
Re-check the advance as engine speed increases as outlined earlier an compare it with what it should be.
If you can’t get an exact match to the correct advance curve, achieve as much as you can of the following, in order of importance:
• Maximum advance
• Advance at 2000-2500 RPM
• Idle
Carburettors (at last!):
Now that everything else is right, it is time to set the carbs.
Never before then! No amount of carb adjustment will address a fault elsewhere!
Begin by resetting to initial defaults:
1. Back off fast idle (temporarily)
2. Release the linkages between carbs
3. Set throttle stops 1 turn from closed
4. Set the jet 0.125” down from bridge (2 turns of the nut for H/HS types)
Start the engine and tune as follows:
- set mixture – the piston lift method is good (refer manual.) In summary it is:
Lift the piston only 1-1.5mm. More accurate if filters removed.
No speed change on lifting = good mixture.
Speed increase on lifting = rich, speed drop = lean.
Purge every 30 sec by raising to 2000 RPM for a few seconds if required to offset any creep in float level.
Big differences between jet positions on different carbs indicate likely undetected air leaks in manifold or booster.
2. set idle speed approximately
3. balance throttles at idle (refer manual for the position of the various adjusting screws)
4. check mixtures,
5. repeat steps 2,3,4 to confirm
6. adjust linkages:
("lost motion" type) to equalise take-up point when accelerator pedal operated, or
(type without lost motion levers) lock the linkages
7. set fast idle (refer manual)
8. test drive
9. If test drive shows lean misfire at steady 30mph (no metrics, these are old British cars!) then renew the metering needle (preferred) or richen up a tad until it goes. Or skilfully fettle ½ thou off the right place on each needle!
10. If you couldn't read the code on the vacuum unit, and the test drive shows vacuum-type pinking (refer above) then renew vacuum unit with the correct type.
11. Repeat test drive if needed, or just for the sheer enjoyment of it.
12. Have a beer and feel smug!
Next time:
Having overhauled and set your carbs up properly, next time you tune the engine – in the correct order of course – having sorted all the ignition timing etc first, you are likely to find that the carbs do not need any adjustment.